This weekend, during a weekly meeting of TáBarato App an idea came out on how we as a really small team could improve our engagement on social media.
A damn nice idea came out that we could have some more posts with some interesting data that we already have and our users would like to have it on their feed and potentially being interested in download our app.
Let me say it again, we're a damn small team of ambitious engineers with a dream, unfortunately at this stage this isn't our money maker, so because of that, my first idea was to basically automate it.
At the same week, I was reading a post about some great developer experience products and one of them made myself interested Bannerbear which is basically what we're talking about a way to create a simple template where I could input my data and push it to any social network easily.
If you're interested about this Developer Experience or simply DX, I strongly recommend to start at this Awesome Developer Experience repository.
The biggest problem with Bannerbear at least on our current stage is the pricing. We initially have a quite simple use case and they have a really awesome bazooka to use, but we're just starting, so no Bannerbear for now 😢.
Then I started my POC for fun.
Proof of concept
My initial goal in the POC was basically being able to create a template programmatically and inject variables on it in a way that I could put inside some lambda and push forward.
So the end goal of it would be simply generating an image based on a template and an input.
No deployment needed, storage or next steps(although I've in mind how the architecture in the end would looks like… ⚠️ SPOILER ALERT ⚠️ I will share a bit of mine initial idea of the end to end plan of it).
Planning phase
I had a damn little experience manipulating images, mostly from the time I made my CMS in PHP(which is a shame I lost, so use Git on your project from start) and it was doing some simple manipulations with ImageMagic lib just to reside and store it in the server.
Besides that again another simple use case to generate images dynamically from my Amazon S3 bucket and provide some resizing manipulation in the query string inside AWS CloudFront (this time, using sharp instead of ImageMagic).
So my initial idea was just to take sharp, and inspired by BannerBear API create a template and process it.
Then before any implementation details I played a bit around how I would like to consume such tool.
After being satisfied with end result, then I moved to the Building phase 😉
Building phase
Take a look on how my template is supposed to looks like:
const template = {
  stage: {
    width: 1080,
    height: 1080,
    background: { r: 255, g: 0, b: 0, alpha: 1 },
  },
  layers: [
    {
      type: 'box',
      position: [200, 100],
      width: 650,
      height: 250,
      background: 'white',
    },
    {
      type: 'box',
      position: [600, 300],
      width: 650,
      height: 250,
      background: 'white',
    },
    {
      type: 'text',
      position: [220, 120],
      color: 'black',
      input: 'productDescription1',
    },
    {
      type: 'text',
      position: [280, 120],
      color: 'black',
      input: 'productPrice1',
    },
    {
      type: 'image',
      position: [200, 500],
      background: 'transparent',
      width: 240,
      height: 360,
      input: 'productImage1',
    },
    {
      type: 'text',
      position: [620, 320],
      color: 'black',
      input: 'productDescription2',
    },
    {
      type: 'text',
      position: [680, 320],
      color: 'black',
      input: 'productPrice2',
    },
    {
      type: 'image',
      position: [600, 700],
      background: 'transparent',
      width: 240,
      height: 360,
      input: 'productImage2',
    },
  ],
}
Then, let me explain a bit on how this template is supposed to work:
Stage
Stage property sets as the name suggest the stage for the other changes, like when you're starting a new file in Photoshop or Figma, you need to set your stage before beginning.
So, simple as providing the size and initial background color.
Layers
This is where the magic begins. Every single component should be a layer, so they're arguably independent.
Those layers have types (described below) and the specific properties from those types.
Type
I decided to support few simple types of objects inside my image generator, box, background-image, image, text and a plan to support some sort of filter also, but not today.
So, this property will let me know what kind of strategy I should use to render it.
Position
This is quite straightforward one, a simple tuple with [top, left] absolute values(px). At some point it can be evolved into relative values as well.
Width/Height
No new concept here, those are exactly as the name suggest, it should define size of our component inside the stage.
Background
A way to force this layer to have a specific background color. A damn useful in the case of boxes where you want them to have a different background color.
Color
Exactly like boxes, but for text type more specifically to set the color of the text.
Input
This would define the name of variable which my generator needs to looks after in the variables object.
const variables = [
  { name: 'productDescription1', text: 'Cenoura' },
  { name: 'productPrice1', text: 'R$: 12,59' },
  {
    name: 'productImage1',
    image_url:
      'https://s3.amazonaws.com/my-awesome-bucket/images/product/Cenoura.png',
  },
  { name: 'productDescription2', text: 'Frango Aurora' },
  { name: 'productPrice2', text: 'R$: 6,99' },
  {
    name: 'productImage2',
    image_url:
      'https://s3.amazonaws.com/my-awesome-bucket/images/product/coxa.frango-aurora.png',
  },
]
So, this is how my variables looks like and how I would include my custom data to be displayed based on the template.
The generator
So, both of our inputs are in place now we must implement a way to transform this code into something that we could possibility think of post into our socials.
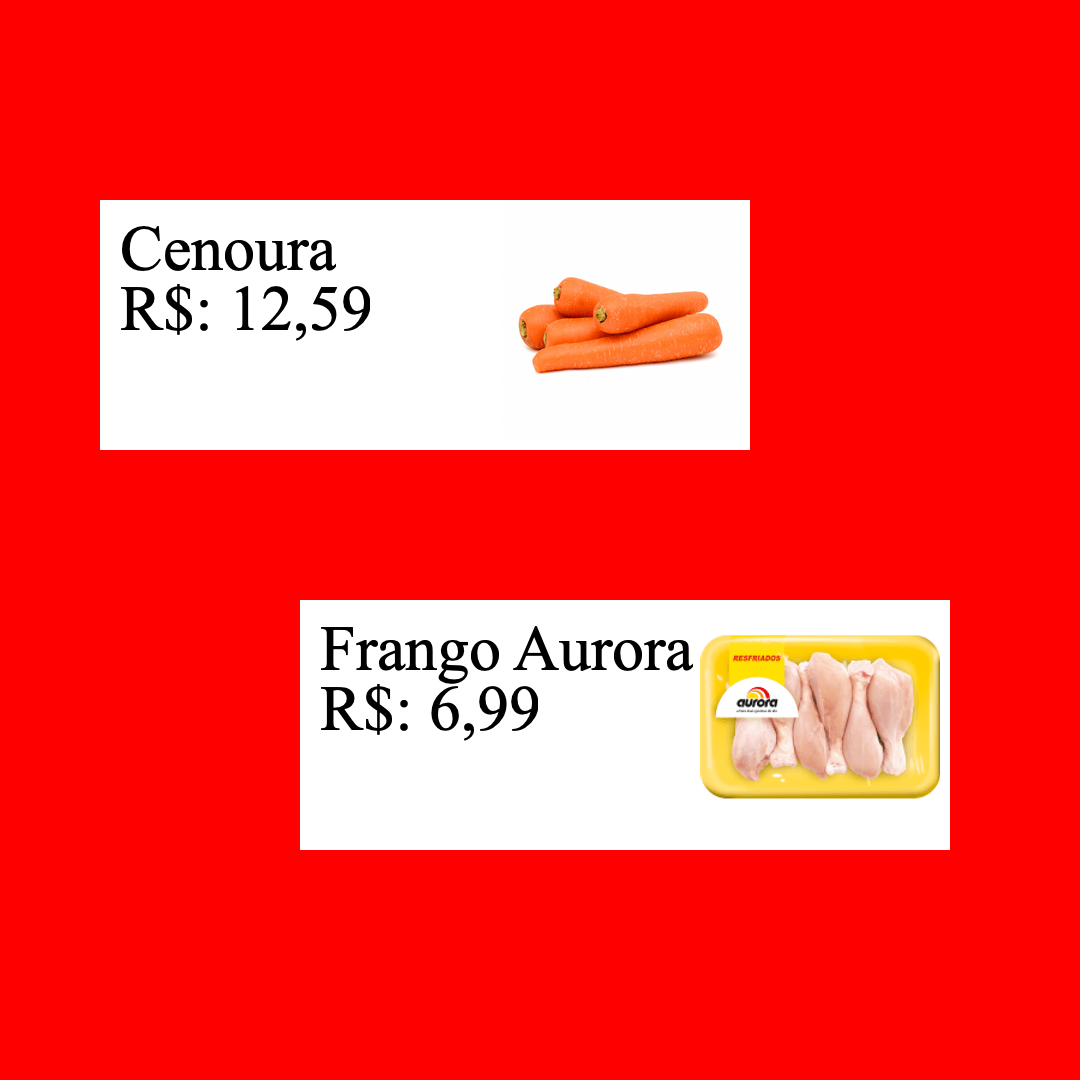
The end result should be something like the image above based on the template.
For brevity I won't post the full code here, but mostly the key takeaways of it, if you would be interested into see this code later on, let me know in the comments.
// Merge layers with available variables
function addVariablesToLayers(layers, variables) {}

// Download image when source is a image url.
async downloadImage(url, image_path) {}

// Basically how to process the layer/component to be shown.
async function processX(stage, layer) {}

// main function responsible to glue everything together.
async function generate(template, variables) {}
This processX is any supported layer type, as how to process and translate the such layer should be treated as a separated strategy to be rendered.
Then in the end of generate function you will be ready to glue everything together inside sharp and being happy.
I would be true if I hadn't to deal with SVGs for texts and boxes.
In here, my biggest issue was that I'm not that into SVGs on the stand point of a developer, but more often as a consumer.
function processText(stage, layer) {
  const textInput = Buffer.from(`
  <svg xmlns="http://www.w3.org/2000/svg">
    <g>
      ${
        layer.background
          ? `<rect
        fill="${layer.background}"
        stroke="${layer.background}"
        stroke-width="0"
        width="100%"
        height="100%"
        x="0"
        y="0"
      />`
          : ''
      }
      <text
        fill="${layer.color}"
        font-size="64"
        stroke="${layer.color}"
        stroke-width="0"
        x="0"
        y="50"
      >
        ${layer.text}
      </text>
    </g>
  </svg>
  `)

  return {
    input: textInput,
    top: layer.position[0],
    left: layer.position[1],
  }
}
So, this is how I do render text at this moment, simply wrap a SVG with rect and text so we could show some text with nice effect of having a background only for the text.
Basically the SVG and using it to display the text and boxes was the easiest way I found to show such contents at this image, but as I mentioned earlier, I'm more convinced that SVG from scratch should do a nice work here, but today I used only sharp.
export async function generate(template, modifications) {
  const { stage, layers: rawLayers } = template
  const layers = addVariablesToLayers(rawLayers, modifications)

  const layersPromise = layers.map((layer) => {
    switch (layer.type) {
      case 'background-image':
        return processBackground(stage, layer)
      case 'text':
        return processText(stage, layer)
      case 'image':
        return processImage(stage, layer)
      case 'box':
        return processBox(stage, layer)
    }
  })

  const readyLayers = await Promise.all(layersPromise)

  await sharp({
    create: {
      width: stage.width,
      height: stage.height,
      channels: 4,
      background: stage.background,
    },
  })
    .composite(readyLayers)
    .png()
    .toFile('./tmp/result.png')
    .catch(console.error)
}
This as simple as how I got it to work and generate the result you saw above also based on the template showed above.
Challenges
Visual Appeal
At this point this generator is damn rustic, although useful for the purpose I made it.
As I mentioned above, dealing with the SVG directly is my main pain point, but it could be overcome after some more deep dive into them.
It would enable me to create much more appealing view of those images.
Calculating Positions
For simple use cases this should be ok doing it, but starting with a real generator that we would need not constant, but changes that can happen often, would be better to build a visual builder for the template, even with simple UI, but at least to help with positioning and sizing (preview also) of the layers of the template would be useful and make our life easier.
Next steps after the POC?
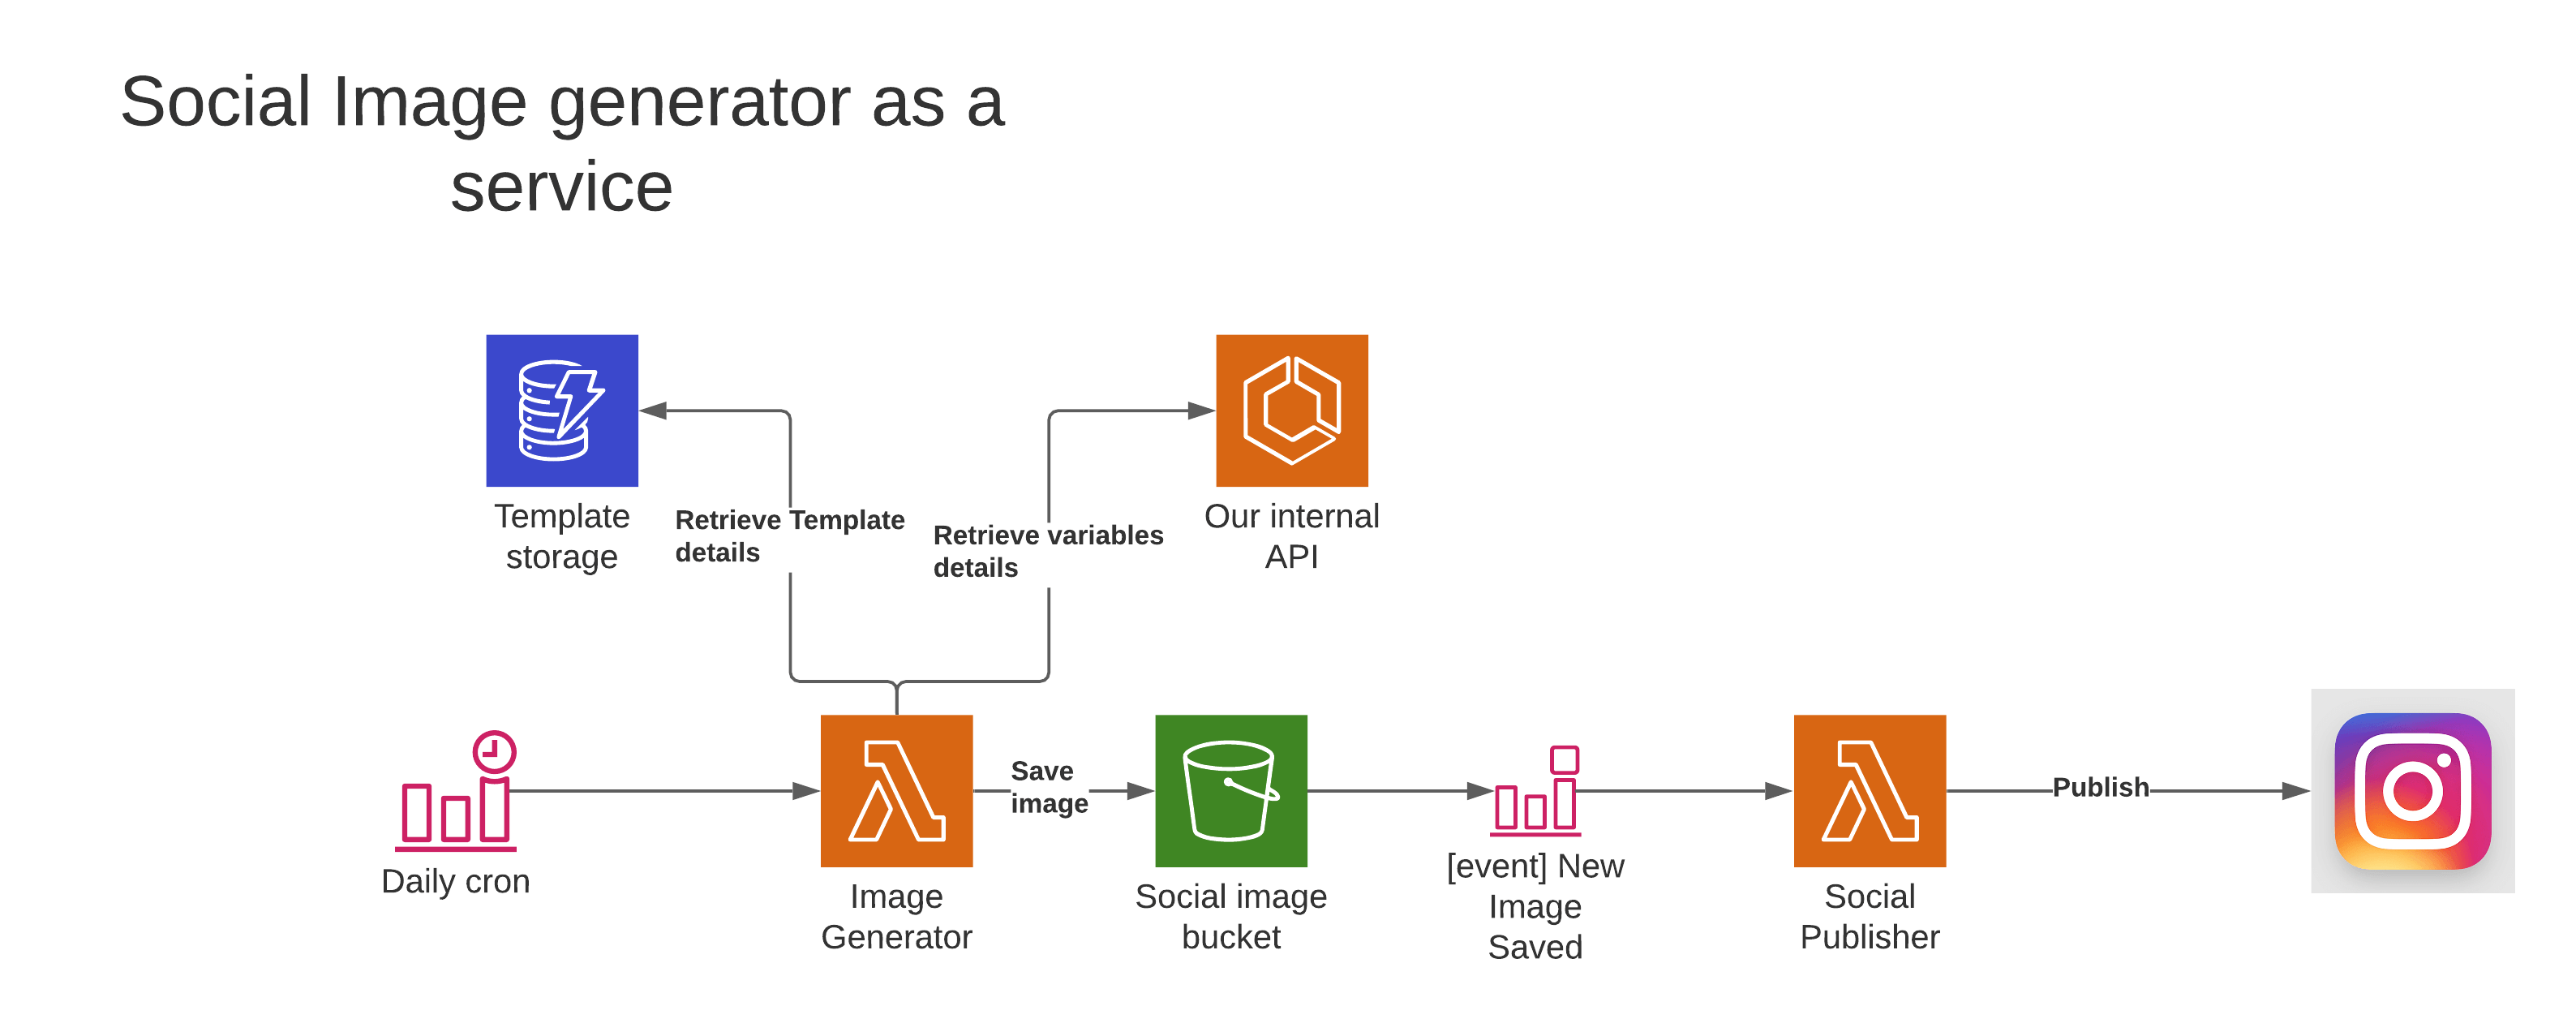
High level architecture of the system
As the proof was basically to show how to generate such images, at this stage I'm satisfied with the result, but of course we need to think about how to continue it.
For now, my main idea is basically trying to find the cheapest most cost effective way of deploying it and 1M executions monthly of AWS Lamba is quite appealing in this area.
Besides that, AWS also offers S3 and DynamoDB on it's free tier which in this case wouldn't require that much of storage, so it's free tier would be more than enough of doing it.
As this is something that we would usually do daily, setting an event (cron job) to everyday to start the image generator using an specific template would be also a possibility.
Lambda itself would just consume our internal API to retrieve the data to put into the template and grab the template from DynamoDB table.
When image is completed, we would basically push it to S3 bucket where after saved, it would dispatch an event to trigger our another lambda which would be responsible to publish the image into our social network of choice.
I believe that's all for now. If you missed any detail that I could improve in the code or found any typo or English mistake, let me know and I will be more than happy to fix and improve my writing.
C ya next